The issue
If we are customizing a SharePoint form we are most likely using PowerApps. A lot of customers make use of a managed metadata column.
This particular column type is however limited in its default configuration. It will only show the first 20 terms of the term set that is configured on the SharePoint column using the following syntax in PowerApps. Choices([@ListName].MMColumn) => This function is limited in the backend to return only 20 items.
However we can use the ‘search’ functionality of the combo box to search for other terms. But this also has its limitation to search only with a ‘StartsWith’ syntax. While most customers expect a ‘Contains’ search behavior. Or just want to see all the options available, because the end-user doesn’t always know what he/she should search for.
As there were some questions on the Power Apps Community forum. We decided to write a blog post about a solution we implemented to ‘fix’ this issue that customers are experiencing.
Our solution
1. Analyze the data needed
Because of the limits on the default backend query of the Choices function on the managed metadata column, we’ll need to provide our own custom data source to the combo box. Unfortunately, we can not directly query the taxonomy store from PowerApps.
So instead we are going to use a Power Automate action to fetch the data from the term store.
Which data do we need? Well if we take a look at the data inside of the collection output of the default Choices() function, we see the following data
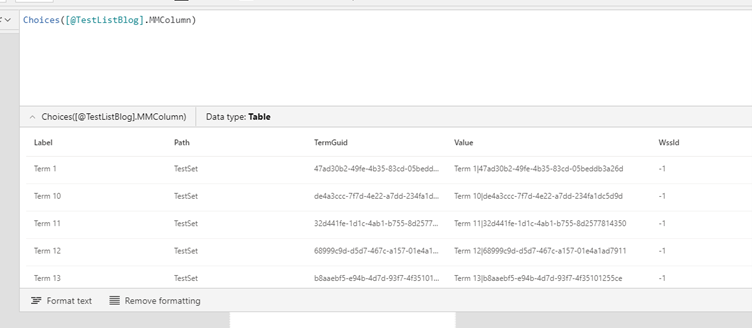
So we’ll need the following properties from our terms in the term store: Label, Path, Guid
The WssId is always defined as -1, even if the terms are already used in the site collection. So we do not need to query that one.
2. Fetching the term data in Power Automate
Find an export of the flow here.
The easiest way to follow this blog post is by downloading and importing the flow above. But also make sure you are reading the explanation below so you know which parameters you should adjust for your scenario.
The flow data conversion / api calls might be a bit complicated, so the easiest way to follow this tutorial is by importing the attached flow. Also make sure you read the explanation below so you understand what the flow is doing / which parameters and properties you might want to change depending on your scenario.
In the ribbon we’ll find the ‘Action’ => ‘Power Automate’ button to create a new flow which we’ll be able to call from our PowerApp.
Now the difficult part comes in. While there are new taxonomy REST api’s available for SharePoint, these will not give all the properties we need. Of course this would be able to return us the Label and TermGuid. But these won’t provide us with the Path of the term.
Note: this will only be an issue if you have multiple levels in your term set.

After this, we are able to do our next call ‘GetAllTerms’ on the loaded term set.
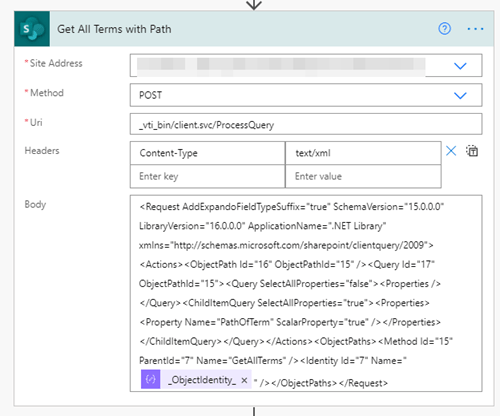
After this call, we’ll need to apply some formatting to the JSON response.
Note: All properties speak for themselves after this HTTP call. But we should take another look at the Path property, as the formatting is a little bit different. It is including the term set inside PowerApps. While in our response from the ProcessQuery endpoint the term set is not included in the path.
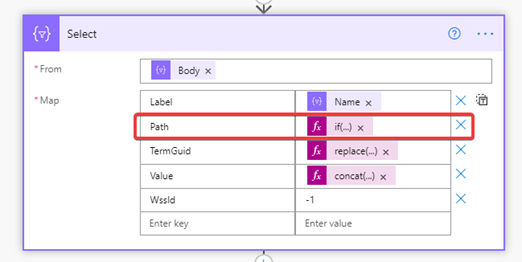
As a last step we’ll need to return this JSON array of term objects to our Power App and parse it into a collection.

3. Parse JSON to a collection in PowerApps
While a lot of blog posts are using the Response action to bring back a parsed collection or object to PowerApps, we will not do this.
Because we want to avoid the premium licensing that is required to use this output action. So instead we are returning a property with the JSON as a string.
Select the event where you want to load your Term data. I’m doing this in the OnVisible action of the screen. Go to ‘Action’ tab -> Power Automate and select the flow that we just created or that you imported from the sample in this blog.
And paste this code in the OnVisible event.
ClearCollect(
YourTermCollectionRaw,MatchAll(GetTerms.Run(“e15b0981-883c-4c5b-8af9-a68a352b9af1”).json,“\{““Label”“:”“(?<Label>[^”“]*)”“,”“Path”“:”“(?<Path>[^”“]*)”“,”“TermGuid”“:”“(?<TermGuid>[^”“]*)”“,”“Value”“:”“(?<Value>[^”“]*)”“,”“WssId”“:”“(?<WssId>[^”“]*)”“\}”));ClearCollect(YourTermCollection,DropColumns(YourTermCollectionRaw,“FullMatch”,“StartMatch”,“SubMatches”)
);
The guide as a parameter of your flow Run function should be the Id of your term set. We could make this more dynamic and just pass the field name and get the term set Id from there. So feel free to extend the flow. But each HTTP action in the flow means a slower response to the Power App, so in my case I wanted it to be as fast as possible.
You can also use the MatchAll function with the syntax above to parse other JSON strings. This is a good way to skip the premium requirement of the Response action, while still being able to parse JSON in your Power App easily.
Also, take note of the DropColumns function we are executing after doing the MatchAll. I’m just using this one to clean up the collection because it does contain some extra properties because of the MatchAll function.
After executing this logic, we can now assign the new value to our combo box field from the managed metadata.
So go to the Combo box component from your managed metadata field and fill in the YourTermCollection as your data source for the field.
Combo box -> Advanced -> Items -> YourTermCollection

Also, make sure your ‘searchable’ property of the combo box is set to true.
If you have more than 1 managed metadata field, you could of course reuse this flow to create another collection with terms. If you do so, remember to use the Concurrent function so you are sure that these flows are executed async. This will result in a significant performance improvement when calling multiple flow actions in the OnVisible event.